| The demand for solid and reliable fixation in this area have been known and used for
many years. Considering the relatively large number of patients and the fact that
Radiotherapy often is the only or best local treatment, almost any RT clinic have tried
to find their optimal solution taken both fixation time, reproducibility, price and patient
comfort into consideration. Although IMRT algorithms have been introduced providing a proven possibility to perform very complicated high-dose set-ups with a potential sparing effect to sensitive organ structures, the most commonly used set-up is still 2 opposed treatment fields from right and left side. An increasing number of individual but in reality identical fixation techniques have been introduced over the last 5-10 years. Most of them are based on the same set-up using a base plate (often in Carbon fiber) with some sort of locking device attached to pre-cut thermoplastic sheets. The backside of the head and neck regions are fixed with a more or less sophisticated "standard" head rest. Relatively often the users do not find repositioning errors to an extend that forces them to seek other systems. Using the 2-field technique will often result in a relatively large margin between field edge and target volume to be set as standard thereby accepting less accuracy to the day-by-day treatment set-up. |
Present and future system demands:The multi-field technique, either using IMRT software or individual field adding to optimize the dose distribution, demands the highest possible accuracy and reproducibility trying to eliminate every possible error source. These are lack of control and fixation of shoulder region in all planes, standard fit from standard head rest, lack of patient comfort and thereby a non-cooperative patient, thermoplastic with too high memory making it extremely difficult to perform detailed mould over all anatomical structures. Basically the fixation system must provide totally individual mould, be fully or at least partially re-usable, provide a minimum of build-up dose to the skin, high patient comfort both during actual mould and simulation/treatment, fast and easy-to-learn actual mould with the possibility to cover all relevant anatomical structures that can be individual fixation points, ridged and reliable size and shape lasting the entire treatment period (6-7 weeks) and naturally as a final result provide a reproducibility within a few mm. The step-by-step guide below describes what is needed and how to proceed and produce a clinical useful and reliable head/neck fixation giving several vital hints. It is recommended to try a couple of times on a staff member prior to any clinical tests. If this set-up generates your interest, please select our Distributors to learn who to contact in your territory to get more information. |
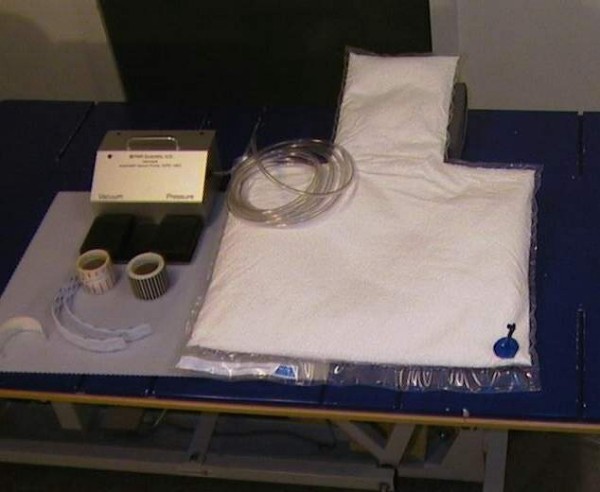
Requirements:A VacFix® Vacuum Cushion - Use a T-shaped cushion in a size matching the patient size. The one used during the illustrated session is 60 x 80 cm (60 cm on base) with the neck-piece being 25 x 30 cm high. Filling is 13 Liter. One cushion for each patient in treatment with 5-10 % extra numbers in stock. Cushions are produced with individual sizes and shapes. One VacFix® Vacuum Pump - AVP-2 model is recommended. Only one is needed for each clinic. Using the foot valves to control the vacuum level and have both hands free during actual moulding process. One Aquaplast RT™ Thermoplastic sheet - The type used here is the RT-1892 type being 46 x 61 cm and 3,2 mm thick. If multi-field technique is required it is recommended to use the 2,4 mm thickness and avoid the cut out of the treatment fields to reduce build-up skin dose. Velcro and hook tape - To attach the moulded thermoplastic sheet to the moulded cushion we recommend to use hook tape on the cushion (as illustrated later) and Velcro tape on the plastic sheet matching the hook tape positions. Marking labels (black/white type or red/white type) - To be able to match the plastic sheet to the patient and the cushion to form a perfect match it is highly recommended to use the marking labels on the cushion to produce position marks (see illustrations later). |
 |
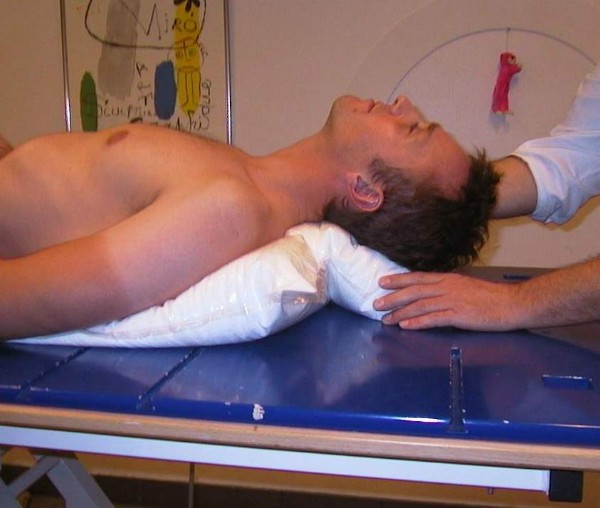
Pre-mould and Patient positioning:With the cushion being very soft make sure that the filling is positioned mostly at the "head end" having an average thickness of 5-6 cm on the narrow piece and similar thickness around the shoulder section. The aim is to shape like a wedge with the thick end under the shoulders filling up the space to the table top completely. Make sure the patient is positioned in the longitudinal direction in a way matching the top of the cushion being on the same level as the top of the scalp when the cushion has been pressed up against the base of the neck to perform the individual shaping of that particular area. Naturally the patient must be placed anatomically correct with even shoulder level and balanced head position. Use position lasers if available. Using the attached vacuum pump set the vacuum level to make it possible to shape the cushion leaving each shape as it is. Due to the nature of the pump it is necessary to re-do the vacuum level setting a few times to make this optimal at all time. Move the head backwards until the base line of the "mandibula" is vertical to the table top. Make sure that the cushion is moulded around the backside of the neck to provide maximum individual support in this area. Ensure that the filling and shoulder position to the cushion is as illustrated. |
 |
How to mould and position the patient - VacFix Cushion:Use the Vacuum Pump to perform an actual vacuum level where the cushion is relatively easy to form but still capable of keeping each shaped structure as moulded. Press the shoulders downwards via the filling in a way where the upper edge of the cushion follows the shape of the "trapezus" muscles and at the same time files out the space between shoulder and table top to give maximum control of shoulder position and optimal support. Try to mould the cushion surfaces on each side of the shoulder area as smooth as possible to provide a later base for the thermoplastic sheet. |
 |
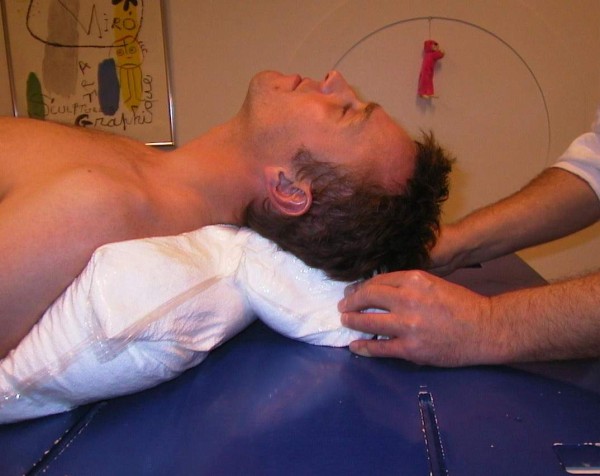
| Make a small low but marked edge around the head base contour. Make the edge towards
the scalp a little higher if possible. This edge is used both as a fixation point itself and as a guideline when the patient has to match the shape during set-up and actual treatment. The trick is to let the patient start a little higher positioned and then slide down until the head has just passed this structure. Doing so will bring the longitude position in the moulded VacFix® cushion correct. |
 |
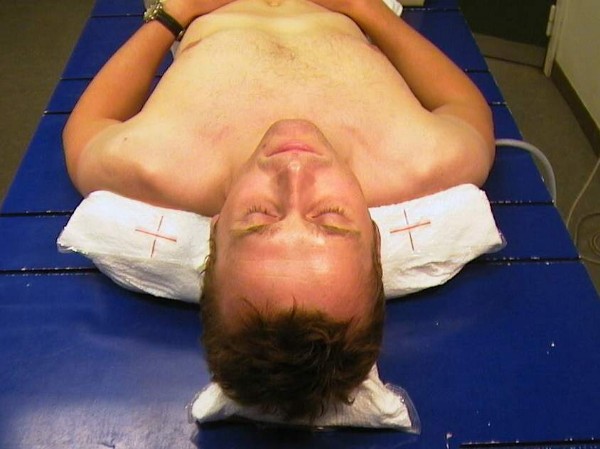
Position markers to align cushion and thermoplastic:Evacuate the cushion to the maximum using the Vacuum Pump. The pump will stop automatically when maximum level is reached. Close the white clamp completely (to the last edge) or close the valve and secure with a piece of tape. Use the red or black markers to form a cross on each side of the shoulders - as illustrated. Now is the time to make a final check of the correct patient positioning in all levels. Use position lasers if available. Re-do fixation if patient position is not correct. |
 |
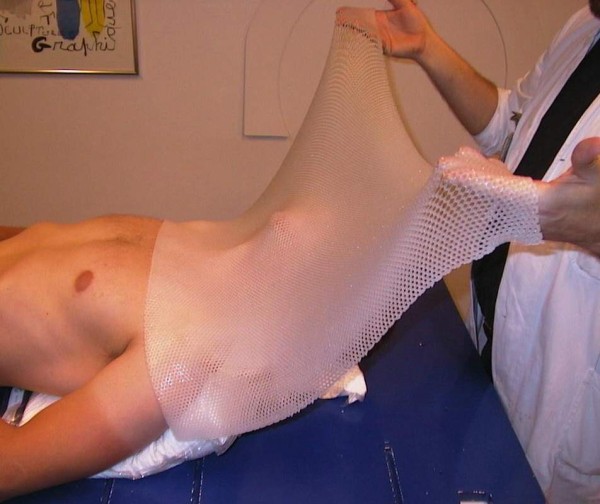
Mould of front shell using Aquaplast RT™ thermoplastic sheet:Remove the Aquaplast RT™ sheet from the water bath and place it on table where the Ultra Thin Net is positioned. Use a towel to remove some of the remaining water. Do this operation fast to allow the total moulding time to be longer. Place the softened sheet (61 x 46 cm in 3,2 mm is used in this session) onto the patient as illustrated starting on the level around the armpits. Hold the 2 top corners as shown to avoid unwanted folders in the plastic material. Let the Aquaplast RT™ fold along the patient contours. The unique behaviour of Aquaplast RT™ (very little internal material memory) makes it possible to construct a large number of single fixation points using only one person to mould (see later). |
 |
|
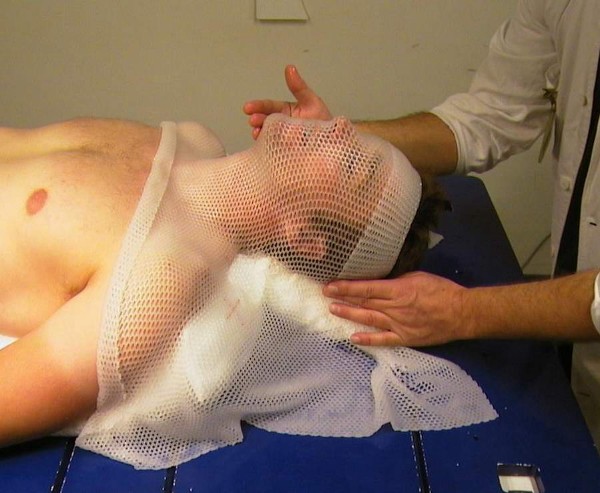
Start with making a double folder plastic on each side (top - bottom) like illustrated
on the image below. This is to make the final mask more ridged allowing to cut our the
treatment field shapes (to lower the skin dose) maintaining the mask stability. Use both hands to mould all possible fixation points in the area (nose, chin, ears, eye brows, shoulders including the "clavicula" impressions on both sides and all the VacFix cushion shapes that are overlaid by the plastic). The unique low material memory on Aquaplast RT™ allows the user to mould any impression only once. The moulded plastic position will stay as positioned during hardening without having to hold and maintain the pressure. This means that one person is capable of making sufficient mould of a very high number of individual fixation points (the number can be between 20 and 25) during the 2 - 2½ minutes of total moulding time. |
 |
How to lower material shrinking:Aquaplast RT™ mould ability is over when the plastic colour starts changing from transparent to white. Although hard and solid on the outside the material is still soft and warm in the center. This is the main reason for material shrinking of 1-2 %. No thermoplastic material is non-shrinking. The only reason for different levels is how fast each material starts to harden up. Shrinking can be limited (never totally avoided) by either leaving the mask on the patient for approximately 30 minutes (this is only recommended if moulding is done in the simulator room prior to actual simulation) or the mask is removed when it appears hard and cooler then immediately sprayed with cold water (10 - 12 deg.) during 2-3 minutes. |
 |
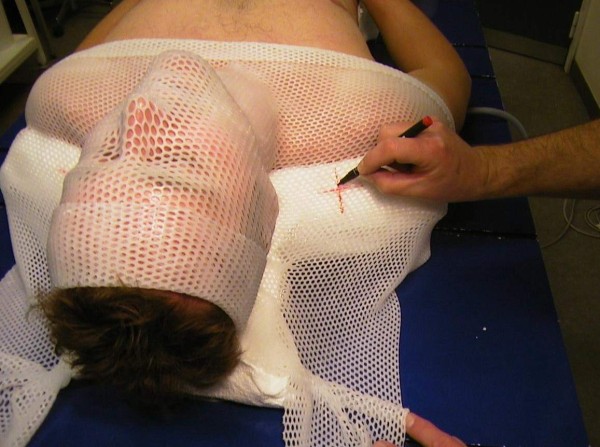
How to align plastic mask and cushion:When the mask is totally white indicating it is ridged it is time to mark the mask position towards the VacFix® cushion. Use a red (or black) marker and draw carefully identical position crosses on top of the ones visible through the mask holes. |
 |
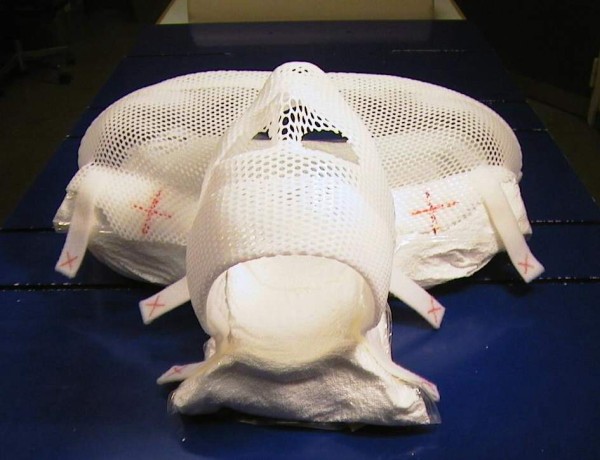
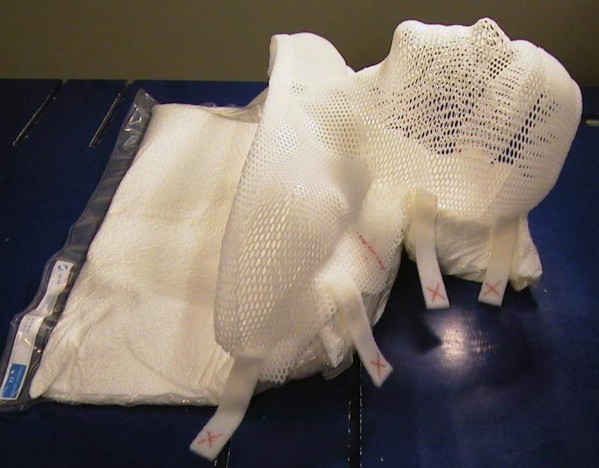
How to prepare and finish the head/neck fixation:Cut away the plastic material covering the low parts of the cushion close to the table top like illustrated on the photo below. Leave the mask on the patient while the adhesive hook tape pieces are attached to the VacFix® cushion (one on each side of the shoulder part, one on each side of the jaw angle and one on each side of the upper head parts). Each piece of Velcro tape is formed as a loop with the open end towards the plastic sheet. Attach each Velcro loop piece using sharp staples exactly on top of each piece of hook tape. If the mask is needed during MRI the sharp staples must be made of hard type plastic and not steel. It is recommended to use 3 pieces of tape (hook and Velcro) on each side of the patient. |
 |
|
The visual small red crosses at each end of the Velcro tape pieces are NOT for alignment
use. They are used in the dimmed light in the accelerator room for visibility purposes only. Extended clinical use (10 years) often provides minor but important helping tools and hints. |
 |